I only recently found out about Kirks Folly line of jewelry
Opened in 1979, it was literally the last jewelry manufacturer based in Providence Rhode Island and it closed Nov 1, 2014.
It looks like it was high end at one point but I think it was sold on TV in america before the ladies retired. Great thread on its closing, many sad fans and bits of info: http://community.qvc.com/t5/Jewelry/Kirks-Folly-closing-their-doors-It-s-over/td-p/1298245
Looking through some of the charm pieces, I have some of the exact charms I bought off Rhode Island sellers. Finally learned who one of the big name brand manufacturer the re-sellers allude to!
Its good stuff. The vintage pieces are amazing of course.
This is the kind of stuff I want to make. Or at least able to make. The pieces are so beautiful!!!
KIRKS FOLLY
Showing posts with label costume. Show all posts
Showing posts with label costume. Show all posts
Sunday, April 24, 2016
Kirks Folly Jewelry from Rhode Island
Saturday, May 10, 2014
Adjusted Bodice Sloper *new pics added*
Bought this dress for 5 bucks at a clearance shop with the idea of fixing it, and I did, just didn't do a super perfect job lol
Anyway I was able to make a sloper that fits my body perfectly and that was worth it because I've been *wanting* to make underwear but haven't really taken any steps towards making any (need a new machine with the zigzag stitch-the one with three stitches per zag) until I made this pattern.
this is the back part of the dress. i already took the front part off
 this is the lining. i used this to make my pattern. you can see the original size on the left side, and on the right side i've put the two pieces closer together to make it smaller.
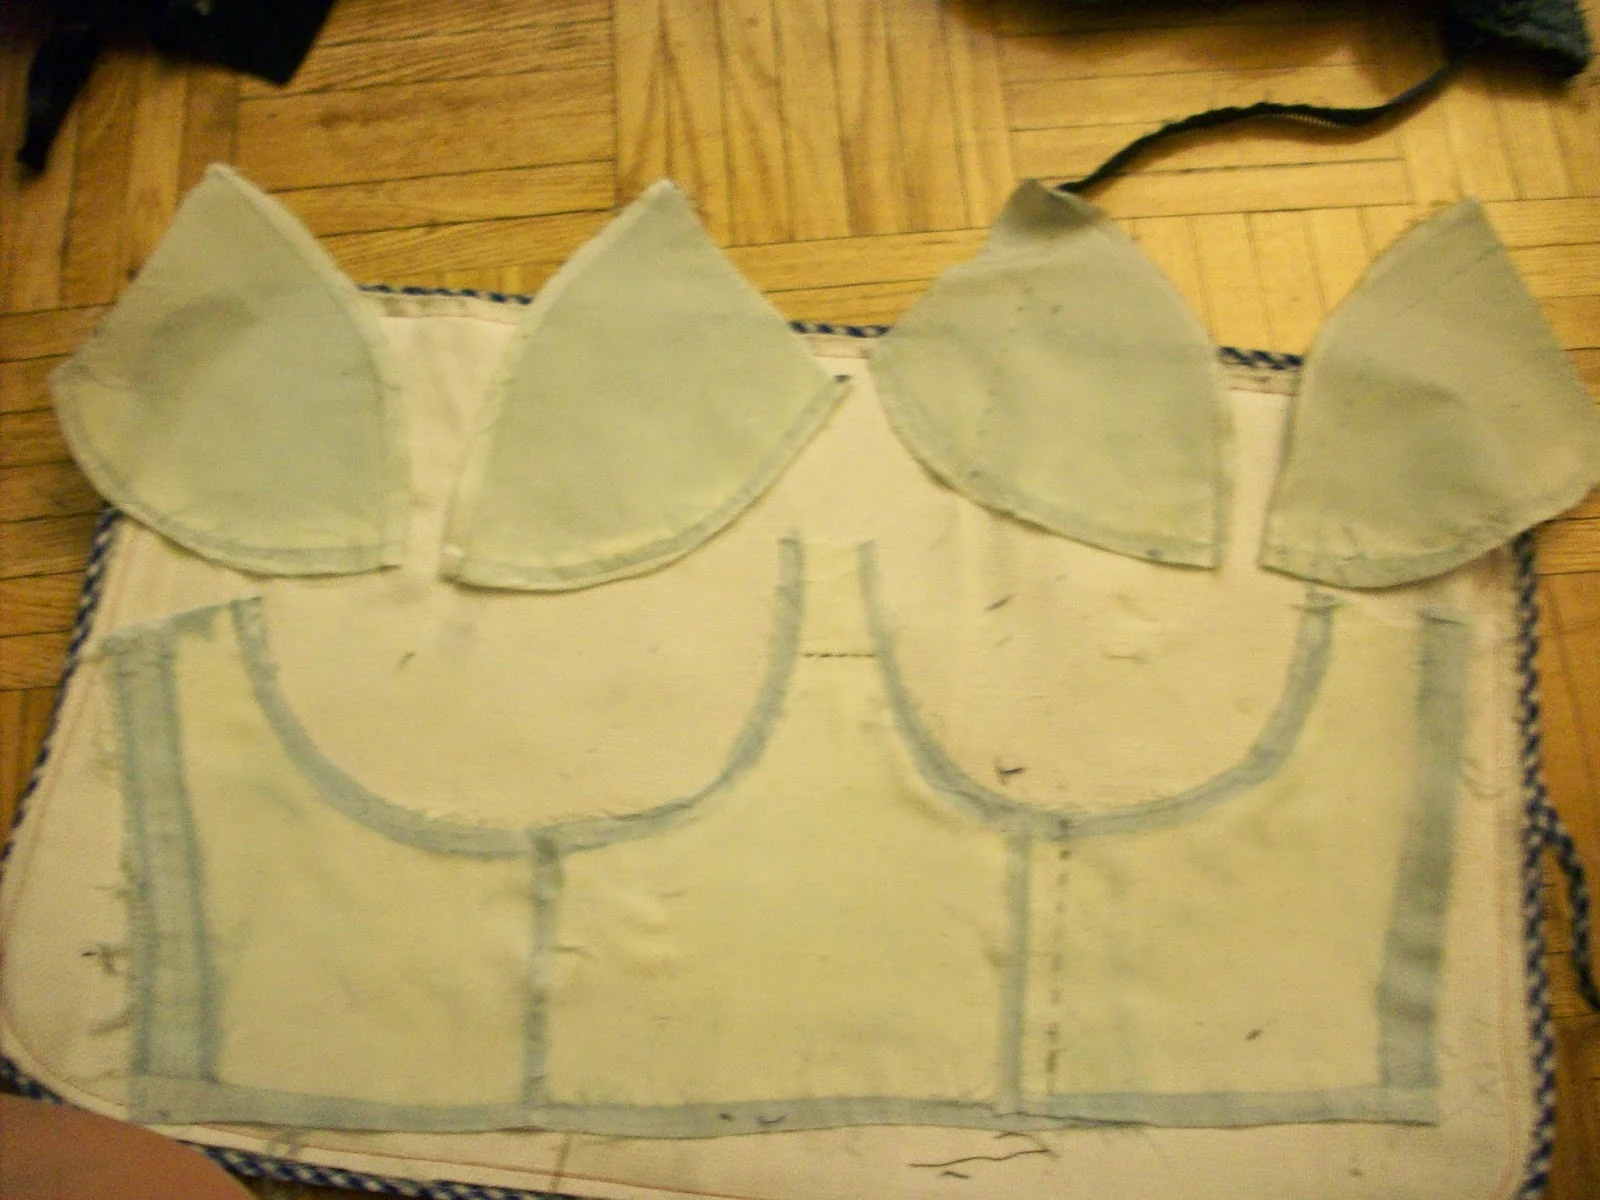 i can't really remember how i figured out how to adjust the boob parts. i think i just pinched the fabric and marked it and guesstimated. oh wait. i didnt guesstimate that much cos you need to match up the measurements. when everything was adjusted i traced the fabric pieces on paper and cut it out and thats now my pattern.
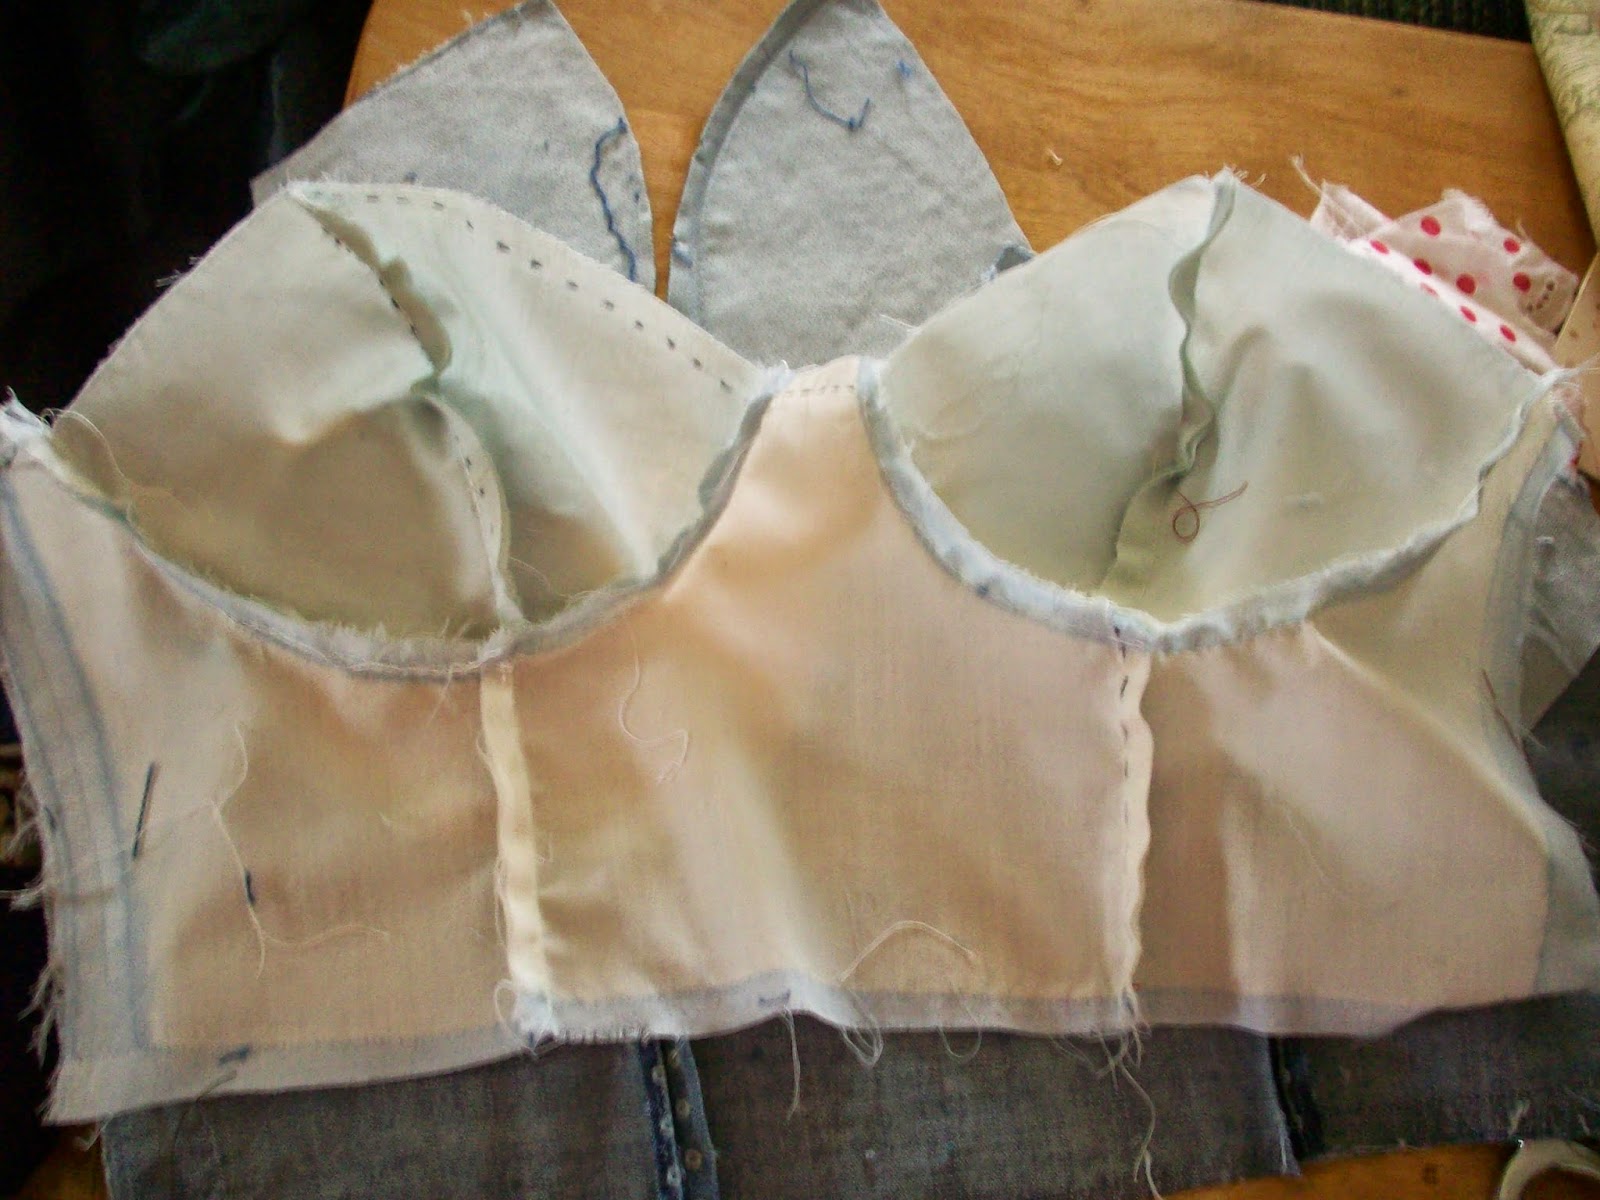
 here is the lining all sewed up, i did a running stitch and fitted it to make sure, then went over it with the machine
 this is the denim/front part. the cups had a fused interface which i didn't remove.

 amazingly enough i managed to save most of the original topstitched-washed edges on the front side and was able to follow along those lines so here it is all sewed up and ready to re-attach back onto the dress. tbh i think this pic might be the front part before i took it apart. wait a second, this make shift tute is getting progressively worse.
 anyway, its done now but i didnt do that good of a job and its a bit wonky. probably because i was too lazy to take the original zipper completely off and i didnt really think about it. so yeah...
so here are the pics of me wearing it all wonky.
its not much work to do it again so when i have time and do some sewing ill finish it. maybe lol
it needs a lot of work like it needs maybe a bra sewed in the cups if i ever wanted to wear it without a bra. hah im so lazy. ok yeah so probably itll look great with a strapless bra. i dont have one.
 ok and here is the zipper side. see what i mean i was being impatient. and look at the results. horrible. also i need to take it in more so its fit perfect. that would also help the bralessness issue.
 this is the other side and see what i mean? i need to sew it in where the dark parts are and it will be a better fit with the fixed zipper side. duh. and match up with the belt. double duh did you see the zipper side belt part lol
 pa dah its all wonky and shiz you guyses. i dunno. but i have a pattern now and yeah ok i guess it could be ok. for sleeping.
 if redo it ill post it again.
oh let me take pics of the inside and ill post here.
Anyway I was able to make a sloper that fits my body perfectly and that was worth it because I've been *wanting* to make underwear but haven't really taken any steps towards making any (need a new machine with the zigzag stitch-the one with three stitches per zag) until I made this pattern.
this is the back part of the dress. i already took the front part off


the weird part was i couldn't remember how the lining and the front
was attached. it was kinda complicated, the bottoms of the cups
were somehow blind stitched onto the front but the rest was loose ugh. i dunno what i did- had to
turn the thing inside out and pass it through itself. it was really confusing


so here are the pics of me wearing it all wonky.
its not much work to do it again so when i have time and do some sewing ill finish it. maybe lol
it needs a lot of work like it needs maybe a bra sewed in the cups if i ever wanted to wear it without a bra. hah im so lazy. ok yeah so probably itll look great with a strapless bra. i dont have one.


oh let me take pics of the inside and ill post here.
Thursday, February 21, 2013
how to make a costume hat
so im making this pothead thing. its pretty tripppyyyy i love it.
here are the pics so far. its getting dark so i wont take any more but im on to adding the greenery.
good thing myEX-imaginary-marijuana-boyfriend (ehem,cough,cough) friend sent me beautiful bud pics so i am copying what the plant looks like and translating it into fabric. and plastic. i bought a fake plant at the dollar store.
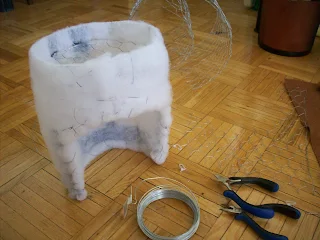
first i made this wire thing. its meant to be a clay pot.
 hah my face. i should wear my retainer again. my freakin snout.
so here it is just the wire

then i covered it in fiber fill, but i forgot to add the top part.. you'll see...


materials are wire, chicken wire, cutting tool, flat nose, fiber fill, needle thread and masking tape


and now covering it and making the buds!!
woops edit! it was too tall haha so i made it shorter.


this is my buddy mark helping me make pompoms

this is kinda what i was thinking it would look like. im going to make a lot more leaves and i hope it looks realistic lol

kinda funny, right?

ill update again tomorrow, i plan on on finishing the pot part.
...
ok so i redid the whole thing, well the plant part. i wasnt too sure and then, my revolutionary boy said it looked like outdoor, mexican brick weed lol
so i bought a different yarn color and ditched the mini tree cos everyone knows marijuana plants dont have little leaves like that, and i just i made a huuuge bud.
i redid the leaves too. the fabric is this super fray crap ribbon, so i folded it in two and sewed finer leaves, no zig zag, and also fray stopped it. what a pain, better to get better fabric, but this ribbon was a great colour and it had a nice sheen like trichromes


so that was before i glued everything together
and here is it finished, the protoype and i can make another from the materials i still have.
i need to make patterns is what i learned. duh. i shouldve known better, also i didnt strengthen it as much as the first plant exploration, so i need to reinforce it as canna therapeutic requested it be strong enough to withstand strong winds!

 i had some really nice pics to refer to and im looking forward to making the first one off the pattern.
pic of me wearing tomorrow its too dark now the ones i have are no good ;D
here are the pics so far. its getting dark so i wont take any more but im on to adding the greenery.
good thing my
first i made this wire thing. its meant to be a clay pot.

so here it is just the wire

then i covered it in fiber fill, but i forgot to add the top part.. you'll see...


so here it is covered, with the top part:

materials are wire, chicken wire, cutting tool, flat nose, fiber fill, needle thread and masking tape

then i added the top part, the actual plant part with the wire (19 guage)


woops edit! it was too tall haha so i made it shorter.

then i added these fake plastic branchy things

here im sewing leaves and i made these pompom buds out of some fancy yarn


this is kinda what i was thinking it would look like. im going to make a lot more leaves and i hope it looks realistic lol

kinda funny, right?

ill update again tomorrow, i plan on on finishing the pot part.
...
ok so i redid the whole thing, well the plant part. i wasnt too sure and then, my revolutionary boy said it looked like outdoor, mexican brick weed lol
so i bought a different yarn color and ditched the mini tree cos everyone knows marijuana plants dont have little leaves like that, and i just i made a huuuge bud.
i redid the leaves too. the fabric is this super fray crap ribbon, so i folded it in two and sewed finer leaves, no zig zag, and also fray stopped it. what a pain, better to get better fabric, but this ribbon was a great colour and it had a nice sheen like trichromes


these are the new leaves

so that was before i glued everything together
and here is it finished, the protoype and i can make another from the materials i still have.
i need to make patterns is what i learned. duh. i shouldve known better, also i didnt strengthen it as much as the first plant exploration, so i need to reinforce it as canna therapeutic requested it be strong enough to withstand strong winds!


pic of me wearing tomorrow its too dark now the ones i have are no good ;D
Subscribe to:
Posts (Atom)


